

 Currently, with the arrival and implementation of IoT, many applications are changing the way they communicate with the world and with people. Technologies are already present in the most quotidian and that includes schools, institutes and universities.
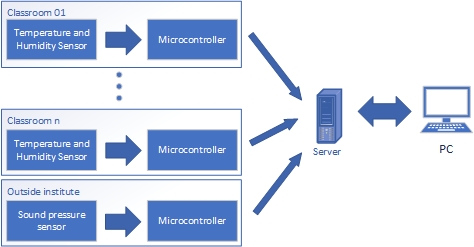
As a teacher of the institute and ICT coordinator, one of my main tasks is to promote the use of information and communication technologies. In touch with the environmental department of the institute, we taking part in a project to make classrooms more efficient. The project consists of monitoring the temperature(ºC) and relative humidity(%) of the different classrooms of the institute, as well as the temperature, humidity and sound pressure level(dB) outside the institute.
To carry out this project we will make use of the IoT technology, allowing us in the not too distant future, the temperature control of the different classrooms independently. It will also allow us to do a follow-up of exercises for the students.
1. Context:
The name of the institute will remain anonymous, but for the purpose we will name it as INS Barcelona. This institute is located on the beach, due to this the temperatures and humidity are usually quite different from the average of the city.
1.1 Institute infrastructure
The institute consists of four floors:
- Low level
- First floor
- Second floor
- Third floor
All the classrooms of the different floors have WiFi coverage and power outlets.
1.2 Data adquisition, send and reception
We will use a Nodemcu board, which incorporates WIFI, along with sensor modules for data acquisition and sending via wireless network. For the reception we will use the local server of the institute, implementing a system with a dashboard to visualize the data with a browser.
1.3 Objectives of the system
- Acquire temperature and humidity
- Acquire external sound pressure
- Send the data of each classroom to the server
- Show data using a dashboard
1.4 Timeline
The plan is to carry out the project and finalize the prototype phase during the 2018-2019 academic year. As a future proposal we have in mind the realization of a fully encapsulated device, with its printed circuit board and its power supply, to be plug-and-play.
2. The microcontroller Nodemcu (ESP8266)
Nodemcu is a open-source firmware and low cost development kit, that includes a programmable microcontroller. In fact Nodemcu is still an ESP8266 (microcontroller with WIFI functionality) along with a USB-UART converter (CH340 or CP2102) implemented on a board with pinheaders.

The advantages of using this development kit for our project are:
- The price without a doubt.
- The capacity of the microcontroller is more than enough for our task.
- WiFi connection.
- Pins to make easy connections
- USB connection to charge or supply.
- Possibility of being programmed with the Arduino IDE.
3. Choosing the sensors
3.1 Temperature and humidity sensor
Why sensor modules?
Simple, they offer us the possibility of changing quickly and easily, and above all because thanks to the large amount of market offer, makes these modules very cheap.
Below we can see a comparison chart with the different modular sensors that are on the market, the common point between the different sensors is that they are easy to obtain and with competitive prices. The signal output of all the sensors is digital, some with a single cable bus and others with two. The power supply voltage is not a determining factor in our case, since we have outputs of 3.3V and 5V.
| Sensor | Supply | Samples /second | Mesure range | Accuracy | Resolution | Long term stability | Price | ||||
|---|---|---|---|---|---|---|---|---|---|---|---|
| Humidity | Temp | Humidity | Temp | Humidity | Temp | Humidity | Temp | ||||
| DHT11 / KY-015 | 3,3 - 5,5V | 0,5 | 20 - 90% | 0 - 50°C | ±5% | ±2°C | 1% | 1°C | < 1% /year | 1,92 € | |
| DHT21 / AM2301 | 3,3 - 5,5V | 0,5 | 0 - 99,9% | -40 - 80°C | ±3% | 0,1% | 0,1°C | < 0,5% /year | ±0,3°C/year | 4,14 € | |
| DHT22 / AM2302 | 3,3 - 5,5V | 0,5 | 0 - 99,9% | -40 - 80°C | ±2% | ±1°C | 0,1% | 0,1°C | < 0,5% /year | ±0,3°C/year | 3,45 € |
| AM2320 | 3,3 - 5,5V | 0,5 | 0 - 99,9% | -40 - 80°C | ±3% | ±0,5°C | 0,1% | 0,1°C | < 0,5% /year | ±0,1°C/year | 2,56 € |
| Si7021 | 1,9 - 3,6V | 0,05 | 0 - 99,9% | -40 - 85°C | ±3% | ±0,4°C | 0,04% | 0,01 ºC | < 0,25% /year | ±0,01°C/year | 3,81 € |
| HDC1080 | 2,7 - 5,5V | 0 - 99,9% | -20 - 85°C | ±2% | ±0,2°C | 0,04% | 0,01 ºC | < 0,25% /year | 4,99 € | ||
| HTU21D | 1,5 - 3,6V | 0,2 | 0 - 99,9% | -40 - 125°C | ±2% | ±0,3°C | 0,04% | 0,01 ºC | < 0,5% /year | ±0,04°C/year | 3,78 € |
| SHT71 | 2,4 - 5,5V | 0,125 | 0 - 99,9% | -40 - 125°C | ±3% | ±0,4°C | 0,04% | 0,01 ºC | < 0,5% /year | ±0,04°C/year | - |
| BME280 | 1,7 - 3,6V | 1 | 0 - 99,9% | -40 - 85°C | ±3% | ±1°C | 0,008% | 0,01 ºC | < 0,5% /year | 4,88 € | |
For our project we are going to measure temperatures and humidity of the environment, that is, we have two variables that are not extremely fast, so the number of samples per second of our sensor is not relevant either. In summary, the sensor to be used is basically determined by the following factors:
- Range of temperatures and humidity of our environment: according to meteo.cat the minimum and maximum temperature in Barcelona during the last 67 years, have been -1.8ºC and 33.5ºC respectively, this will be our minimum range.
- Resolution of measurements: doesn’t matters, a minimum of 1% / 1ºC it’s okay.
- Long term stability: lower deviation is better.
- Price: lower allways better.
Therefore, discarding the cheapest sensor DHT11 / KY-015 that does not reach our minimum range, the sensor to choose will be the AM2320.
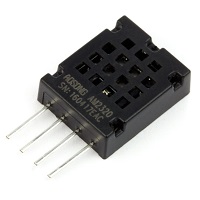
The AM2320 sensor has I2C output, it will allow us to connect the sensor with the microcontroller in a simple way. The sensor is also tolerant to a power supply of 3.3V or 5V, however, we will supply it with the LDO linear regulator with 3.3V output provided by Nodemcy, which will offer us with a more stable signal than we can obtain from a 5V USB charger.
3.2 Sound pressure sensor
For the sound pressure sensor we will use an electret microphone with MAX4466 adjustable amplifier.
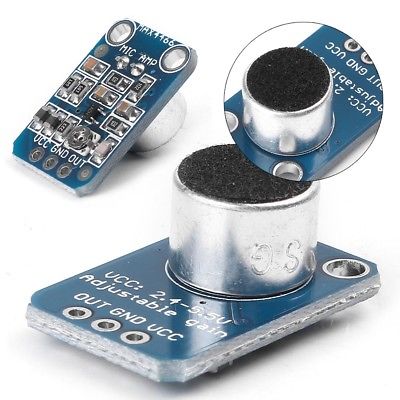
Unlike other sensors, this module provides an analog voltage output, this is good for us, because we don’t want to know if there is a sound or not, we want an output value proportional to the sound outside the institute.
But we have a problem using this sensor, the output of the sensor is a analog voltage value acording to sound intensity (see condenser microphone operation). So, we have an output that is not linear according to SPL (sound pressure level), and we need to implement some operations.
The formula of SPL is:

where
- p is the root mean square sound pressure;
- p0 is the reference sound pressure;
- Np is the neper;
- B = (1⁄2 ln10) Np is the bel;
- dB = (1⁄20 ln10) Np is the decibel.
In the section of programming we will see how we solve this problem, but for the moment we advance that we will need an external tool that allows us to calibrate the dB of sound pressure.
4. Programing Nodemcu
En este apartado tenemos dos posibilidades, dejando de banda que el dispositivo unicamente enviara datos, podemos realitzar una programación generica para todas las placas y que posteriormente in-situ se haga la configuración, o realizar una programación única para cada placa. Personalmente me decanto por la opción que permita configurar la placa mediante un interfaz web por ejemplo, nos proporcionara una solución más verstail, a la hora de poder exportar este proyecto a otros lugares, e incluso la facilidad de colocar nuevos dispositivos.
4.1 Web browser config
4.2 Acquire data
4.3 Send data
5. Setting up the server
6. Power supply
5.1 Power supply for the prototype
5.2 Solar cells supply
Conclusion
Budget
| Component | Units | Price |
|---|---|---|
| Nodemcu v1.0 | 1 | 2,94€ |
| AM2320 | 1 | 2,56€ |
| USB 5V charguer | 1 | 5,00€ |
| Total per classroom | 10,50€ |
For the moment…
Bibliographie
http://www.meteo.cat/wpweb/climatologia/serveis-i-dades-climatiques/series-climatiques-historiques/
https://www.adafruit.com/product/1063
https://circuitdigest.com/microcontroller-projects/arduino-sound-level-measurement